*****I'm looking to make some extra money, so if you need someone to revamp your blog or do some graphic design/web design for you, please contact me. I won't charge much, just a small fee. :)


Showing posts with label shawill. Show all posts

Saturday, May 29, 2010

Major haulage!

I know, I know. Some of you are probably thinking I've gone MIA again. But nope! Such is not the case--it's just that I'd had a rather busy week last week. I spent all day Wednesday shopping with my BFF, and then spent Wednesday night through Friday at her place. That had to be the longest sleepover I've ever been on!

I have so much to show you all! Bought on a budget of $60... I will however have to divide this post in two. One post for the makeup/nail polish, and one post for the clothes that I had bought. But all in all, I spent my money quite wisely, I do believe! I spent around $10 of my $60 on make up and nail polish.

These are the fruits of my bargain hunting: 12 nail polishes, 1 blush, 1 e/s palette and a tube of lip gloss. Yes, all of this for $10 (Php 470)!

I bought four bottles of Jocarste polish. For local readers, if you've been to Landmark TriNoma and have seen the display of Jocarste at the Shawill booth, you would know that a bottle costs around Php80 (roughly $1.30) each. Well, where I bought it, I got each at Php25 (a little over $.50)!

Here are pictures! I'll definitely be doing NOTDs and reviewing these products soon. Next time I am also going to make a better light box so I can take better pics without the crazy backgrounds. :)


And a little bonus: I'm going to a wedding on the 6th of June and I decided I NEEDED a hot pair of shoes to wear along with my pretty little dress. So here they are! Bought for Php 700 or around $15 last week (so this was on a completely different budget, not part of the $60 budget). I had a different pair of shoes in mind but I have to be mindful of my/my family's budget. Plus I love finding bargains! isn't that little bow completely cute? ^^


That's all for now. Watch out for my next post (which I promise won't take so long as this one did!

ETA: I also have a brand new Formspring! I have the widget on the LEFT sidebar of my blog, so if you feel like asking me questions...go right on ahead! ^^

Tuesday, February 16, 2010

Pre-Valentines Party

Yeah, yeah. I know I'm super late with posting this but I've been busy...the semester is ending soon (SUMMER SOON YES) so everything is just piling up... haha. Sigh.

Anyway, how was your Valentines'/Chinese New Year? I didn't really celebrate myself since I'm single..haha. But I did have dinner with my family (immediate and cousins etc) because it was my cousin's birthday--and of course, to celebrate Chinese New Year.

I did go to a party last Friday though, at my friend's house. We decided we would have a 'Wild Lovin' theme--basically just an animal theme. I didn't have anything animal-ey to wear so I thought I could paint my nails but then that wouldn't be very noticeable. So I went out to see if I could get anything cheap to wear (since I'm not likely to wear anything animal print on a normal day). I managed to find leggings for only P70 (less than $2), so I just figured I could go to the party kinda casual. Good thing a lot of other people did the same, I mean people didn't even follow the theme! Lol.

I just did my makeup to match my outfit so I wouldn't be too out of place. Forgive the crappy image quality. I slept over at my friend's house (the house where the party was held) so I couldn't bring a lot of stuff.

The makeup:

Since I had school that day it was too much of a hassle to bring a lot of stuff..so I only brought my Coastal Scents 88 matte palette and my Shawill 12 palette. Despite this, 3 of my friends still wanted me to do their makeup..haha.

FACE Maybelline Clearsmooth face powder
CHEEKS Ever Bilena blush in Raisin
EYES ELF studio eye primer and eyeliner sealer, Coastal Scents 88 palette, Maybelline eyeliner, Maybelline Volum' Express Cat Eyes mascara
LIPS Shawill gloss
CHEEK CHEETAH PRINT ELF studio eye primer, Coastal Scents 88 palette

The cheetah print on my cheek was a lot more clear and defined in real life..my camera phone is sucky :( It wasn't that blurry, the lines were sharp I promise! Hehe

I forgot undereye concealer..so I couldn't conceal my dark secrets. Sigh

The outfit:
Leggings (they are supposed to be grey).
The casual outfit...haha

Anyway. I'm working on something right now--my baby thesis! It's going to be about makeup so I'll be posting here what I work on for it. (:

Happy Wednesday, have a good day today!

Saturday, January 23, 2010

I'm Back! [+Tutorial]

WOW. It's been so long since I last posted (in October!), and I feel so out of it. I've just been so busy with school, and couldn't find the time or inspiration to play with makeup. For a few months I barely even touched my stash, except for my daily face powder+lippie combination. Haha. But now that I'm back I realize just how much I miss blogging and makeup in general. I also miss reading blogs, which I now have promised myself to devote at least half an hour to every night.

Many things have changed since I last posted in October. For one, I've gotten a lot more health conscious and I've been exercising more, and because of this I've gotten rid of, or am in the process of getting rid of several health problems I've been having for a while now. Not only that, I feel much more energetic, and my change in diet (aka change in lifestyle) has allowed me to keep my skin a lot less oily and almost completely blemish free! Of course, this was with the help of a dermatologist, but at the same time I know that my current eating habits are very helpful to maintaining the smooth skin I've managed to achieve.

I've changed my bedroom around, moved furniture and whatnot, and I now have a desk by the window which would be perfect to do my makeup on (finally, even light!).

My friend Sam and I are working on something that we hope to finish soon. I'll give you more details on that later.

But for now, how about an FOTD and a tutorial for it? I've completely missed doing this, it's crazy! Haha. For today, I wanted to try using L'oreal's British Red lipstick, so I decided to do a pin up look.


I started with a cleansed and moisturized face. I concealed my undereye circles and put on Maybelline's Clear Smooth face powder (yes, no foundation) for light coverage. I moisturized my lips with Nivea (3-in-1) Pinkish Boost lip care


Items used:
FACE Celeteque Moisturizer, ELF Studio undereye concealer/highlighter, Ellana Minerals concealer in Smile
CHEEKS Shawill blush in #01 (used very sparingly), Physician's Formula pears of perfection bronzer
EYES ELF Studio eye primer, NYX ultra pearl mania in Mink, Jesse's Girl quads 432A-2 and 432A-3, ELF eyeliner in coffee, MAC Zoomlash, Jordana kohl eyeliner in silver
LIPS Nivea Lip Care 3-in-1 pinkish boost, L'oreal lipstick in British Red


It's optional that you use eye primer, but I prefer to use it so I primed my eyes first. Then, with the a fluffy angled eyeshadow brush (pictured above), pick up NYX ultra pearl mania in Mink (color 1) and pat onto eyelids going just above the crease. Build to desired intensity like in the picture below.


Use a small fluffy domed brush (pictured above) to deposit color 2 (a matte brown) onto crease, buffing and blending carefully in order to achieve an effect like pictured below. Don't forget to bring the color lightly toward the inner corner of the eye.


Above: Use a fluffy eyeshadow brush (I used ELF's eyeshadow brush, the one that sells for $1 each) and pick up your highlight color (color 3). I used a soft/pale gold. Sweep the highlight color generously under the brow bone and apply to the inner corner of the eyes to achieve an 'awake' look. Blend into dark brown color on crease.


Line your eyes with your choice of eyeliner. I used ELF's eyeliner in Coffee--it's hardly visible in this picture so using EcoTool's angled brush I picked up some of color 4 (a shimmery brown)

and I went over the line I made with ELF's eyeliner in Coffee, so now it will stay put better, not to mention look more prominent. I did the same thing (ELF's eyeliner in Coffee + Color 4) on my lower lid.


Fill in your eyebrows and apply mascara to your upper and lower lashes, and we're done!


If you feel like looking more fresh-faced, leave it at this. But because I wanted to try the L'oreal lipstick in British Red, I just put some on. And that's the finished look!

More pictures:


I think L'oreal's British Red is gorgeous. I'm not so sure about how it looks on me, but for those who are a fan of red lippies, I think this is a definite must-have! I might review it sometime soon.

I guess that's all for today. I hope you enjoyed the tutorial. :)

So how is everyone? I miss you all!

Saturday, October 17, 2009

Doing makeup for someone's big day [+tutorial and haul]

Does anyone get the nervous jitters when they're asked to do makeup for someone's big day as well? My cousin Catherine asked me to do her makeup for her graduation (she's an Octoberian) last Oct 11. Of course, I said yes. How could I say no! The morning of her graduation, she showed me her dress, then we hung out for a bit before she went to get ready so I could go and do her makeup.

I have pictures of the process (ha! I didn't forget to take pics this time :D), so this could also serve as a tutorial.
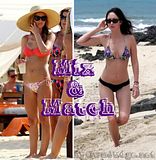
Here is a before and after shot:
I think I did pretty okay!

For the eyes, I used again my Shawill palette #1, as in the photo below. The colors I used (in order) were #5, #12, and #7.


First I started by priming her eyelids. I used UDPP for this step. Then, I took a fluffy eyeshadow brush and applied color 5 to half her eyelid, from the inner corner and stopping at the middle. I went a little above her crease for this one so the pink would show just a bit when her eyes are open.

Next I took color 12 with a crease brush and applied it to her outer v. Using a fluffy blending brush, I blended it into color five on her eyelid and went a little above her crease to darken her socket.

We both decided that since it was a formal event we would lessen the amount of pink that showed so we added more of color 12 , blending over the pink.

Taking a fluffy eyeshadow brush, I applied color 7 as a highlight under the brow and on the inner corners of her eyes. Then I lined her eyes with Coastal Scents gel eyeliner.

After I curled her lashes and applied mascara, I put color 12 on her lower lashline, smudging some gel eyeliner on top. Then I put mascara on her lower lashes.

Finished look:


I don't remember what else I used on her face, but I used Shawill lipgloss for her lips (layered on top of Prestige lipstick in plum). I do know that the white cast in photos was caused by The Face Shop primer in green, but it went away after a while, thankfully!

I discovered it's really tough for me to do someone's makeup (maybe because I'm so used to putting makeup on myself. I'll get the hang of it soon enough with practice, though! :D

And yes, she did her own hair. I don't have the tools or the talent/skill to do hair, since mine is hopeless and I just always tie it up in a bun. Lol. But I'm thinking about investing in a good flat iron. Any suggestions? Not more expensive than $30-$50 I hope.

Anyway. Today was an adventure for me and my cousin Jen, we had fun just looking around and shopping for makeup! We caught wind that there would be a bazaar at Rockwell, so we went together. And true enough, there was a bazaar, but it opened at 2 pm and we were already there by 10am to avoid traffic. So we ended up taking a cab to SM Megamall (3-day sale of up to 50% off!) and wandered around in the cosmetics department. I bought a few things there, some of which I'm already loving even just now.

From L-R: Nivea lip care in cherry, Himalaya Herbals gentle face wash cream (freebie), Himalaya Herbals neem face pack (mask). The rest are freebies and a dental mirror, lol. It was going for $1 and I just had to get it.


At 1:30 PM, we went back to Rockwell (after we had lunch) to check out the bazaar. We were disappointed when we saw there was a P100 entrance fee because we didn't hear about it, but we paid and went in.


Here is the Charm brush I bought from Beauty and Minerals for 750PHP (bazaar price). I'm going to do a review on it soon.


Well, that's all for now! I'm gonna wash the hair mask out of my hair now and then try the Neem face pack. :D I'm definitely gonna review it, too. Have a good day, everyone!

Friday, October 16, 2009

Ube Keso inspired EOTD + Tutorial

Ube keso is a delicacy here in my country. I can't exactly explain what it is, but it's really yummy (although not exactly a favorite of mine). But while I was at the mall earlier today, I saw a picture of this while I was passing by a fast food place and decided that I needed to do a look with purple and yellow in it. It's a pretty color combination, after all! It oddly enough works with eyeshadow, too. So I decided I'd do a tutorial as well.

**** After some research I found out that ube is purple yam. :) (and of course, keso is cheese). Here is a wikipedia link: http://en.wikipedia.org/wiki/Ube

For this EOTD/FOTD, I used mostly Shawill products (if you recall I featured Shawill on my blog recently).

This will be the finished look:


For this, I used the following:

FACE Celeteque Moisturizer, The Face Shop primer in green (used for red spots only), Ellana Minerals concealer in Smile, MAC Studio Fix in NC35, Mineraux foundation and Mineraux neutral mineral veil
CHEEKS ELF bronzer in warm tan, ELF illuminizer (I forgot what it's called), Shawill blush
EYES Art Deco eyeshadow base, Shawill palette #1, Dollface Cosmetics 28 neutral palette, ELF transparent brow gel/mascara, ELF eye brightening pencil eyeliner in coffee, Maybelline eyeliner in black, Maybelline Volum' Express Cat Eyes mascara
LIPS PAC lipstick in misty brown, Shawill lip gloss


We will be using colors (in order) 9, 3, 12, 7


If you desire, start by priming your eyelids to make your eyeshadow more vibrant, and to prevent it from creasing or fading. For this step, I used Art Deco eyeshadow base.

For the next step, take your favorite eyeshadow brush (I used elianto's angled eyeshadow brush) and get color 9, applying a wash all over the eyelids.


Then, using the same brush, pick up color 3 and place on outer corner, blending into yellow and bringing it inwards around the crease and socket.


Taking color 12 with a crease brush or a small domed brush for precise application (I used Sembem/Life & Companion's crease brush), apply over outer v and bring into crease, concentrating color on the outer corner. Blend blend blend!


Using the same brush, get color 7 and apply as a highlight on inner corners. If desired, get an eyeshadow brush and pick up some of color 4, layering over the purple in order to create a better gradient effect.


For the next step I used my Dollface Cosmetics palette (28 neutral). I used color 2C, taking a fluffy eyeshadow brush to apply as highlight under my eyebrow, blending into purple color.


For eyeliner, I took a thin, stiff-bristled brush (I was using an EcoTools brush), taking some of color 12 from the Shawill palette and using it to line my upper eyelids. I used the same brush to apply color 9 and 3 on my lower eyelids, letting them meet in the middle. I lined my waterline with Maybelline eyeliner in black.


Curled lashes and applied mascara on upper/lower lashes...and we're done! :D


The finished look:


Tada! I hope you liked my tutorial! :D

Related Posts with Thumbnails